
10 Checkerboard Kitchen Ideas
Checkerboard kitchens have a way of feeling playful, classic, and surprisingly fresh all at once. Whether you love vintage details, bold contrast, or a more updated look, this pattern can bring movement and character into an everyday cooking space without making it feel overdone. For many homes, checkerboard details work best when balanced with warm materials, soft finishes, and practical storage that keeps the room usable. From floors and backsplashes to textiles and painted accents, there are many simple ways to bring this look into your kitchen. Some ideas lean timeless and retro, while others feel softer, cleaner, and more current. This list shares inspiring checkerboard kitchen ideas you can actually use, whether you want a full room makeover or just a small update that changes the entire mood of the space beautifully.
Quick List:
- Classic Black and White Checkerboard Floor
- Soft Beige and Cream Checkerboard Tiles
- Checkerboard Backsplash With Glossy Finish
- Painted Checkerboard Kitchen Island
- Checkerboard Open Shelf Styling
- Retro Checkerboard Breakfast Nook
- Sage Green and White Checkerboard Accent Wall
- Checkerboard Runner for a Narrow Kitchen
- Warm Terracotta Checkerboard Flooring
- Mini Checkerboard Decor Touches
Classic Black and White Checkerboard Floor
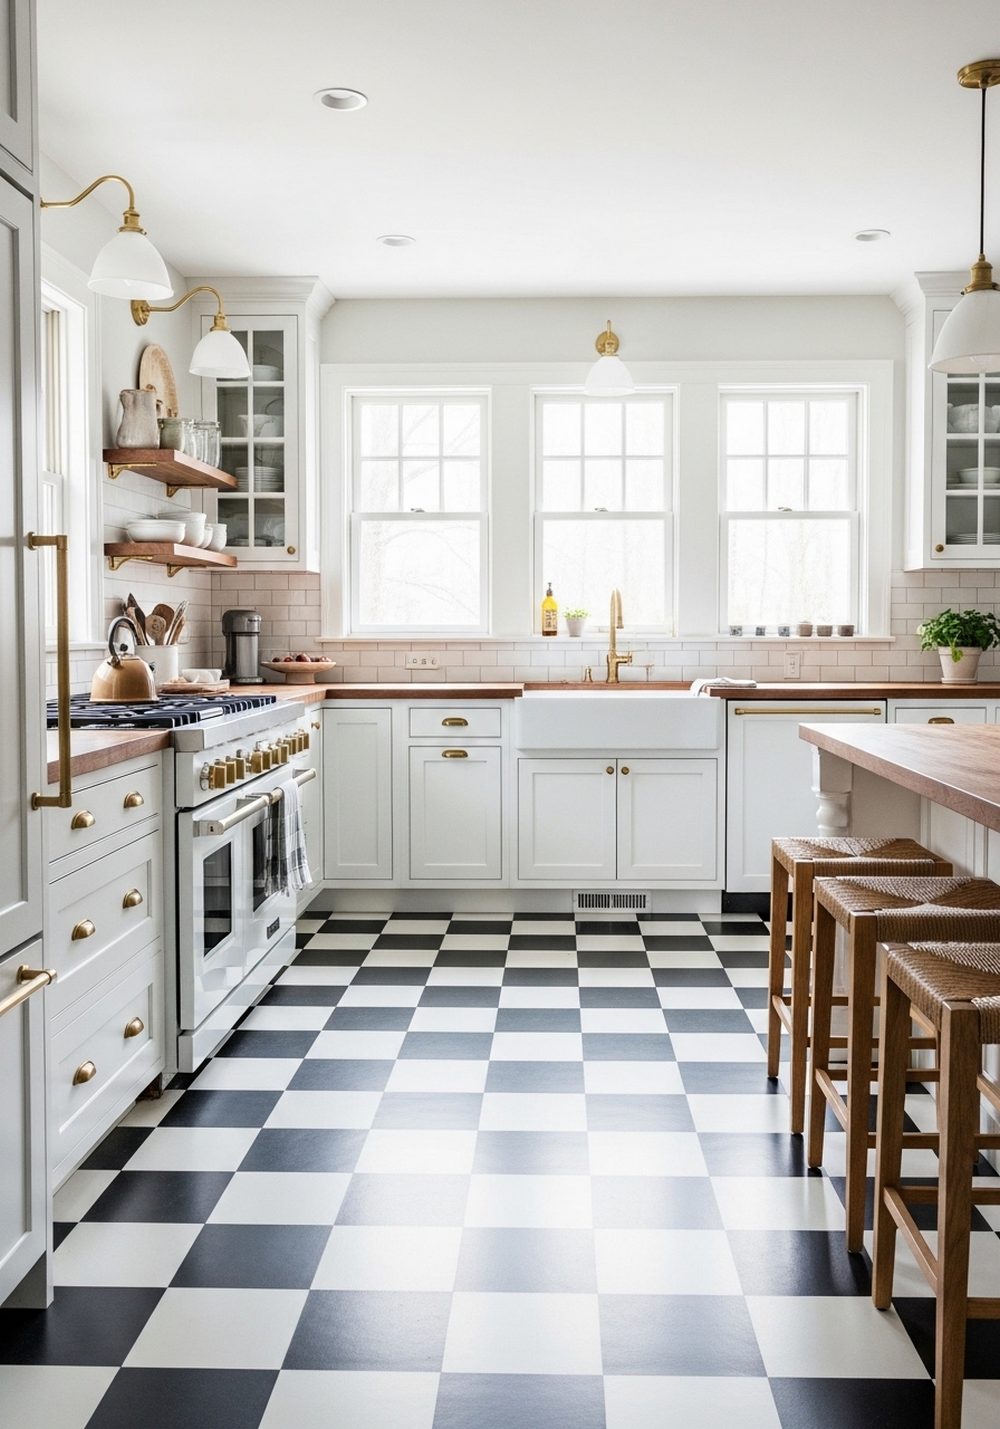
A classic black and white checkerboard floor instantly gives a kitchen strong personality without needing many extra design elements. It works especially well with white cabinets, wood counters, brass hardware, and simple pendant lighting. This idea feels vintage, but it can still look clean and modern when the surrounding finishes stay minimal. Large tiles make the pattern feel bolder and more open, while smaller tiles lean traditional. Add a few warm textures like woven stools or linen curtains to keep the contrast from feeling too stark.
Best For: Timeless kitchens that need a bold focal point.
Where To Place It: Across the entire main kitchen floor for maximum impact.
Color Palette Tip: Use warm whites and soft wood tones to soften the black contrast.
Materials / Items Needed: checkerboard floor tiles, grout, white cabinets, wood accents, brass hardware, pendant lights
Budget Level: Medium — Tile installation costs more, but the look lasts for years.
DIY Difficulty: Hard — Floor tiling needs precision and careful layout planning.
Style It Like This: Pair with shaker cabinets. Add wooden stools. Keep counters lightly styled.
Common Mistake To Avoid: Using too many competing patterns nearby can make the room feel busy.
Soft Beige and Cream Checkerboard Tiles
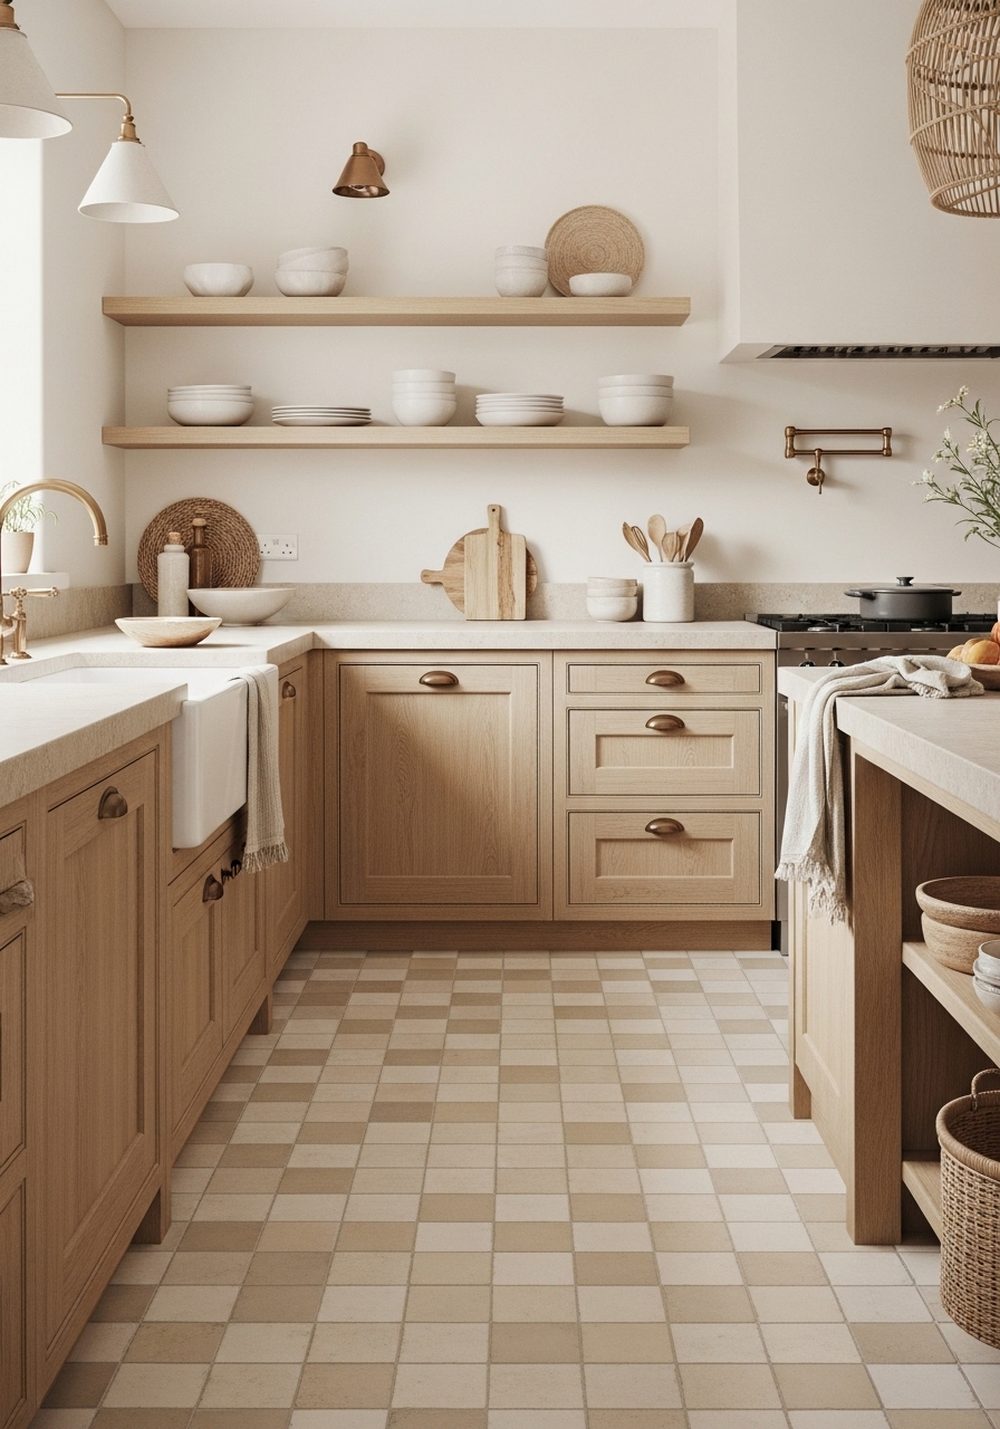
For a softer take on checkerboard style, beige and cream tiles create gentle contrast that feels warm, airy, and easy to live with. This version suits cozy kitchens that do not need a dramatic black and white statement. It blends beautifully with natural oak cabinetry, stone counters, and open shelving filled with neutral dishes. Because the tones are close together, the pattern adds interest without overwhelming the room. Choose matte finishes for a relaxed look, and layer in textured textiles so the kitchen feels inviting rather than too polished.
Best For: Cozy kitchens with a warm and relaxed design style.
Where To Place It: On floors in small to medium kitchens where softness matters.
Color Palette Tip: Mix cream, sand, oat, and light wood tones for a calm finish.
Materials / Items Needed: beige tiles, cream tiles, matte grout, oak accents, neutral textiles, stone countertop details
Budget Level: Medium — Materials are manageable, but professional floor work may add cost.
DIY Difficulty: Hard — Even subtle checkerboard layouts still require accurate measuring.
Style It Like This: Use woven baskets. Add linen curtains. Display soft neutral ceramics.
Common Mistake To Avoid: Choosing colors that are too similar can make the pattern disappear.
Checkerboard Backsplash With Glossy Finish
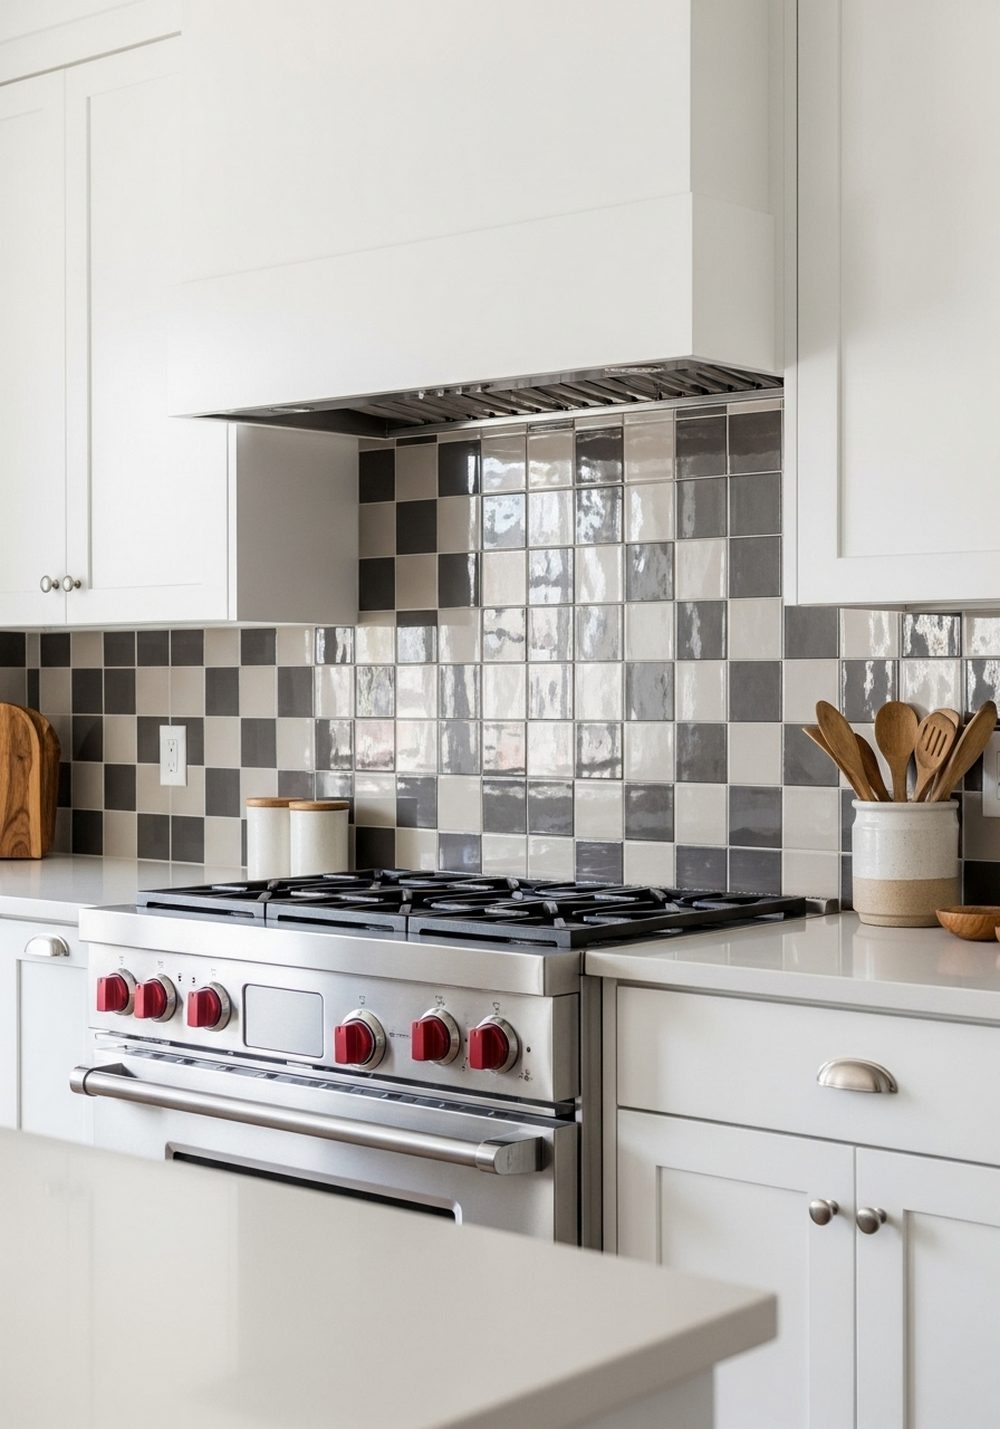
A checkerboard backsplash is perfect when you want the pattern in a smaller, more controlled way. Glossy tiles reflect light beautifully and make the kitchen feel brighter, especially in compact spaces. You can use black and white for a crisp retro look or try muted colors for something gentler. Because the backsplash sits at eye level, it becomes a natural visual feature behind the counter or stove area. Balance the bold pattern with simple countertops and clean cabinet fronts so the overall kitchen still feels practical, polished, and easy to maintain daily.
Best For: Small kitchens that need pattern without changing the whole room.
Where To Place It: Behind the stove, sink, or full countertop wall.
Color Palette Tip: Pair glossy tiles with matte cabinets for a nicely balanced contrast.
Materials / Items Needed: backsplash tiles, tile adhesive, grout, simple countertops, under-cabinet lighting, sealant
Budget Level: Medium — Smaller surface area keeps costs more controlled.
DIY Difficulty: Medium — A backsplash is easier than flooring but still needs care.
Style It Like This: Keep counters clear. Use sleek hardware. Add one warm wood accessory.
Common Mistake To Avoid: Extending the pattern into too many surrounding surfaces can feel overwhelming.
Painted Checkerboard Kitchen Island
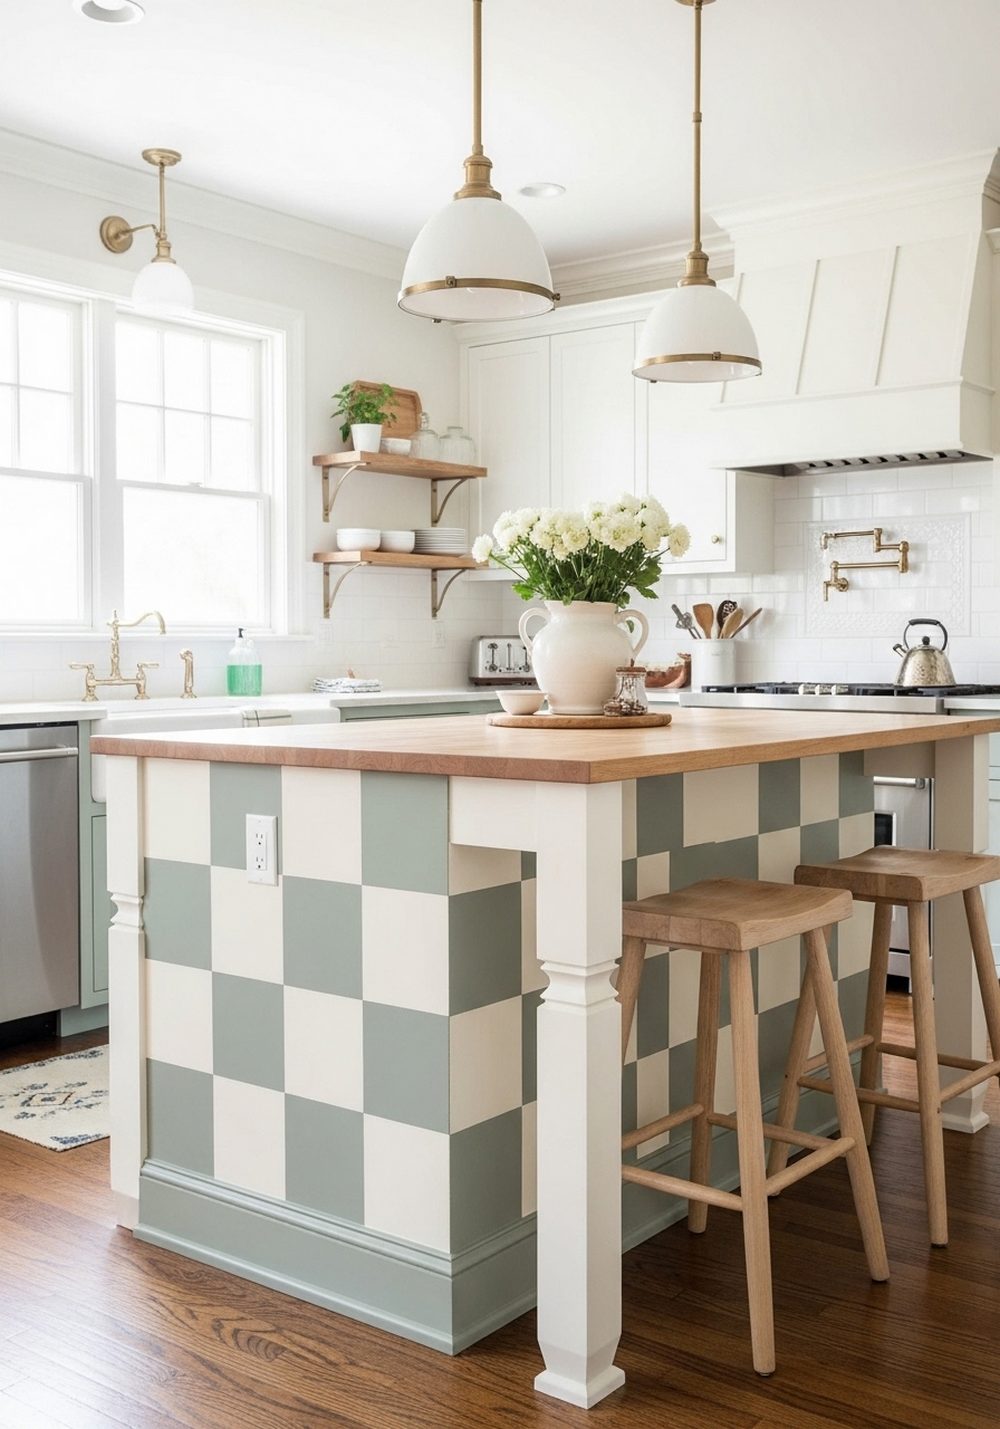
A painted checkerboard kitchen island brings personality into the room without requiring tile work or a full renovation. This idea works especially well in cottage, vintage, or playful family kitchens where color and character matter. You can paint the pattern on the side panels, front face, or even the countertop base for a custom look. Pair it with simple surrounding cabinets so the island becomes the standout feature. Choose durable paint in satin or eggshell finishes, then seal it properly to help it handle everyday messes, scuffs, and frequent kitchen use.
Best For: Budget-friendly kitchen updates with lots of visual personality.
Where To Place It: On the island base panels or front-facing sides.
Color Palette Tip: Try cream with sage, black, dusty blue, or warm taupe.
Materials / Items Needed: paint, painter’s tape, primer, topcoat sealer, sanding block, small roller, brush
Budget Level: Low — Paint creates a big change without major renovation costs.
DIY Difficulty: Medium — Straight lines and good prep make all the difference.
Style It Like This: Keep hardware simple. Add stools in natural wood. Repeat the accent color once.
Common Mistake To Avoid: Skipping surface prep can lead to peeling or uneven paint edges.
Checkerboard Open Shelf Styling
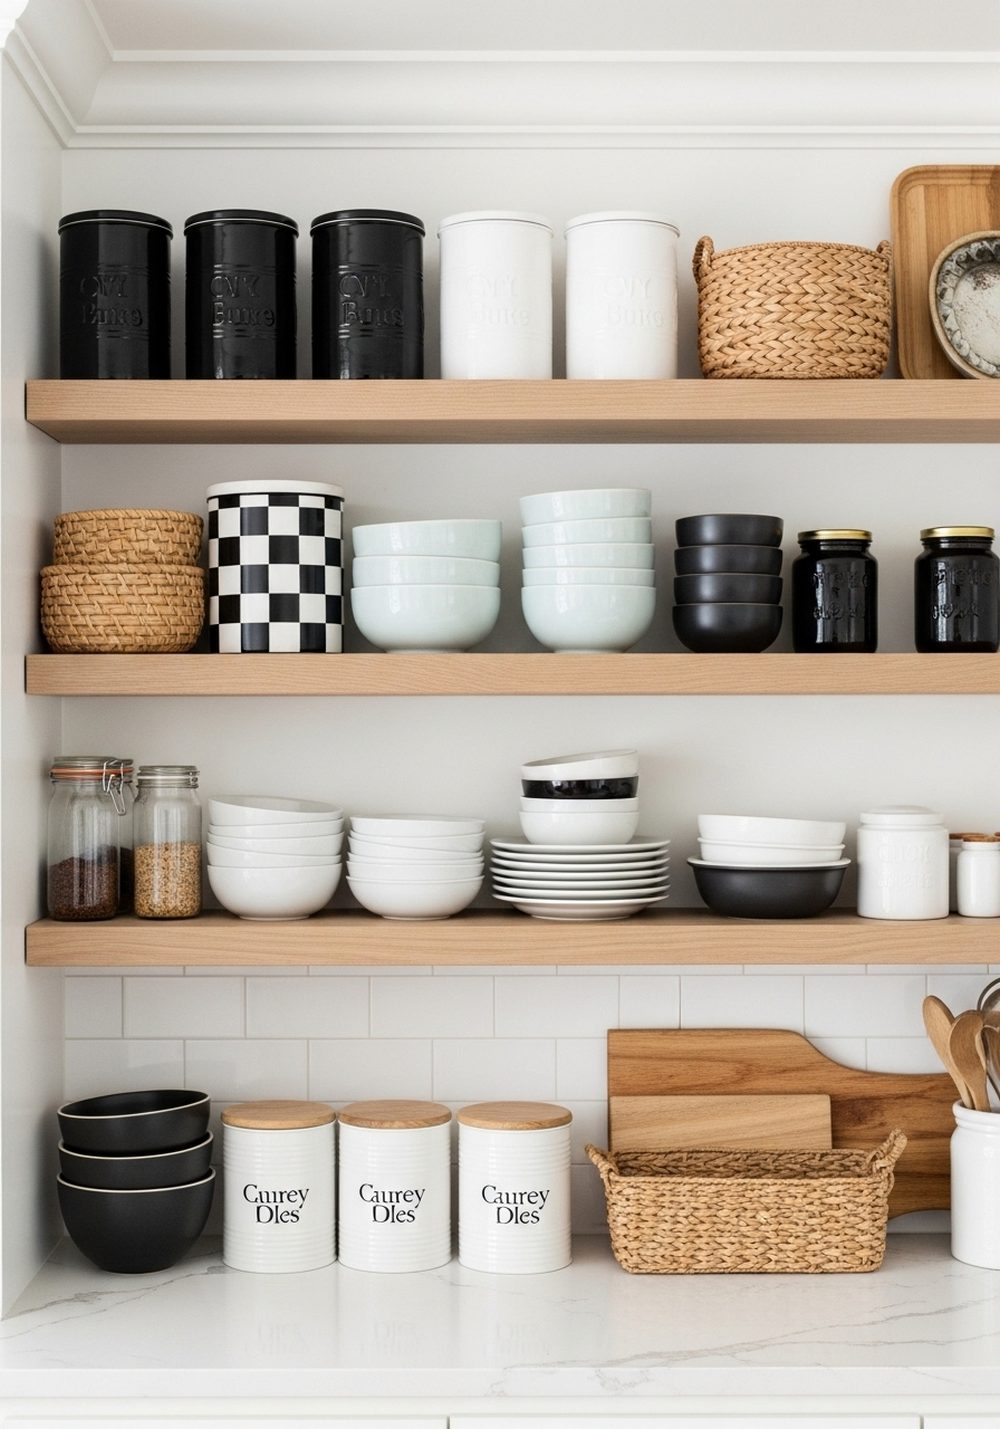
Checkerboard style does not always need to come from tile or paint. Open shelves can create the same visual rhythm when styled with alternating colors, shapes, or storage pieces. Think black and white canisters, light and dark dishes, or baskets mixed with ceramics in a repeating pattern. This approach feels flexible, affordable, and easy to refresh with the seasons. It is ideal for renters or anyone who wants a softer version of the look. Keep the shelf layout balanced and not overcrowded so the checkerboard effect reads clearly instead of messy.
Best For: Renters or anyone wanting a non-permanent checkerboard look.
Where To Place It: On open kitchen shelves above counters or coffee stations.
Color Palette Tip: Alternate strong light and dark tones, but keep undertones coordinated.
Materials / Items Needed: open shelves, canisters, bowls, plates, baskets, ceramic pieces, storage jars
Budget Level: Low — You can create the effect with items you already own.
DIY Difficulty: Easy — Styling shelves is simple and easy to adjust.
Style It Like This: Repeat colors evenly. Leave breathing room. Mix matte and glossy textures.
Common Mistake To Avoid: Overfilling shelves makes the pattern disappear into clutter.
Retro Checkerboard Breakfast Nook
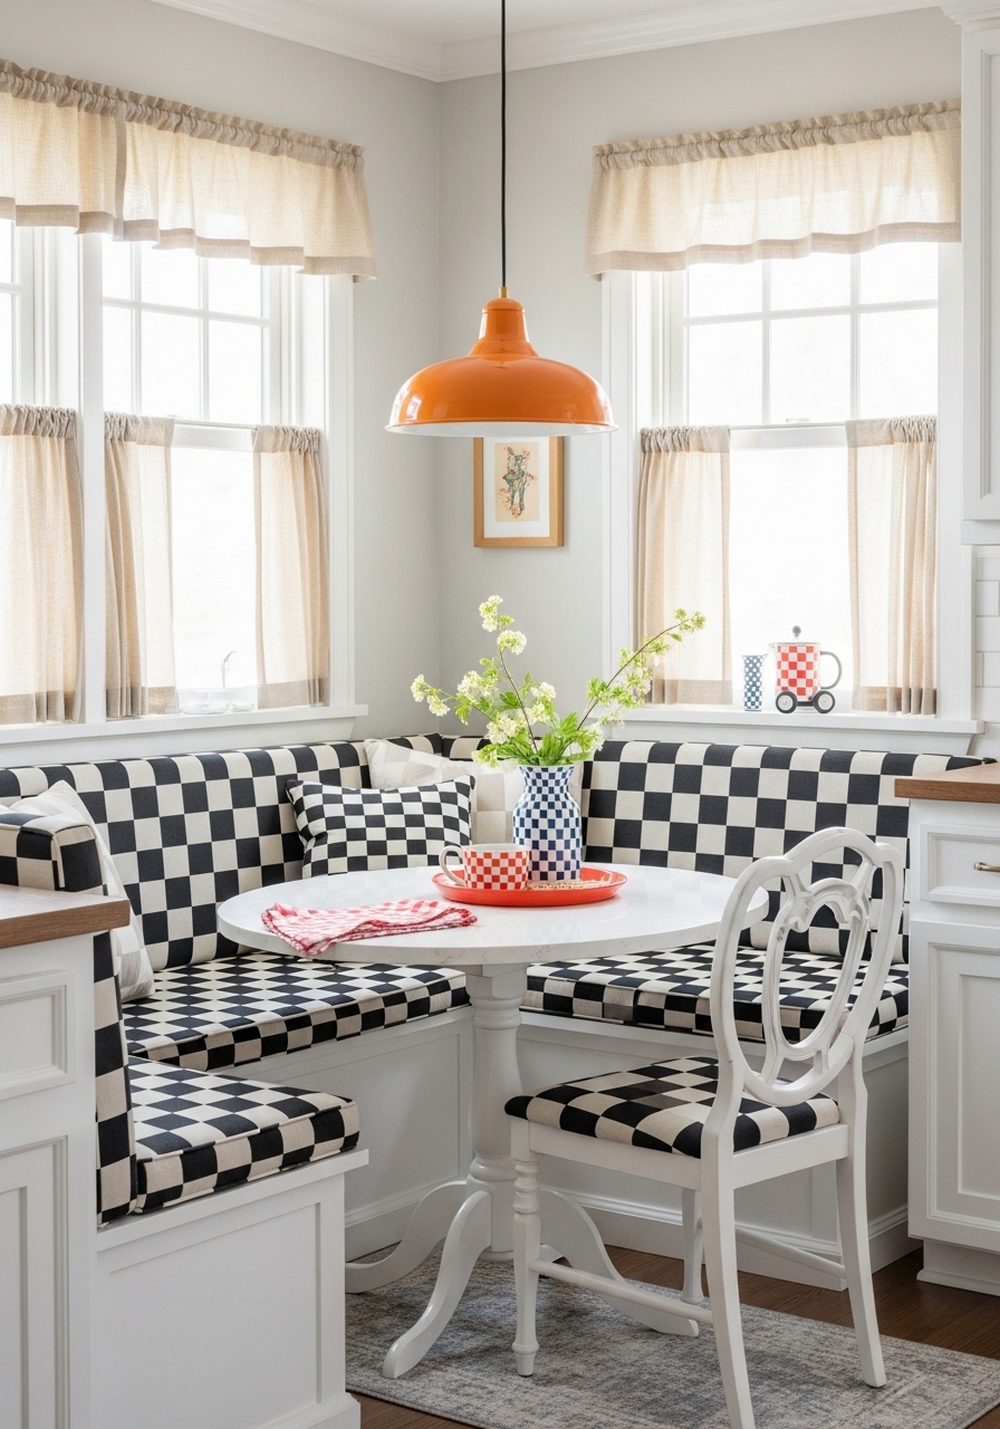
A checkerboard breakfast nook captures cheerful retro charm and makes even a small kitchen corner feel special. Start with checkerboard seat cushions, tiled flooring, or a patterned table surface, then add rounded furniture and warm lighting for that cozy diner-inspired mood. This idea works beautifully in homes that want a fun, lived-in atmosphere instead of a formal kitchen design. Keep the colors consistent so the nook feels intentional, not themed. A few vintage-style details like café curtains or a milk glass vase can complete the look without making it feel overly nostalgic.
Best For: Family kitchens that need a fun and inviting dining corner.
Where To Place It: In a breakfast nook, corner banquette, or eat-in kitchen spot.
Color Palette Tip: Use cream, red, black, or pale mint for a retro-inspired mix.
Materials / Items Needed: bench cushions, checkerboard fabric or tile, small table, pendant light, café curtains, vintage-style accessories
Budget Level: Medium — A nook update can stay affordable with simple material choices.
DIY Difficulty: Medium — Combining textiles and furniture is manageable for most homeowners.
Style It Like This: Add a round table. Use soft pendant lighting. Include one vintage accessory.
Common Mistake To Avoid: Going too theme-heavy can make the space feel costume-like.
Sage Green and White Checkerboard Accent Wall
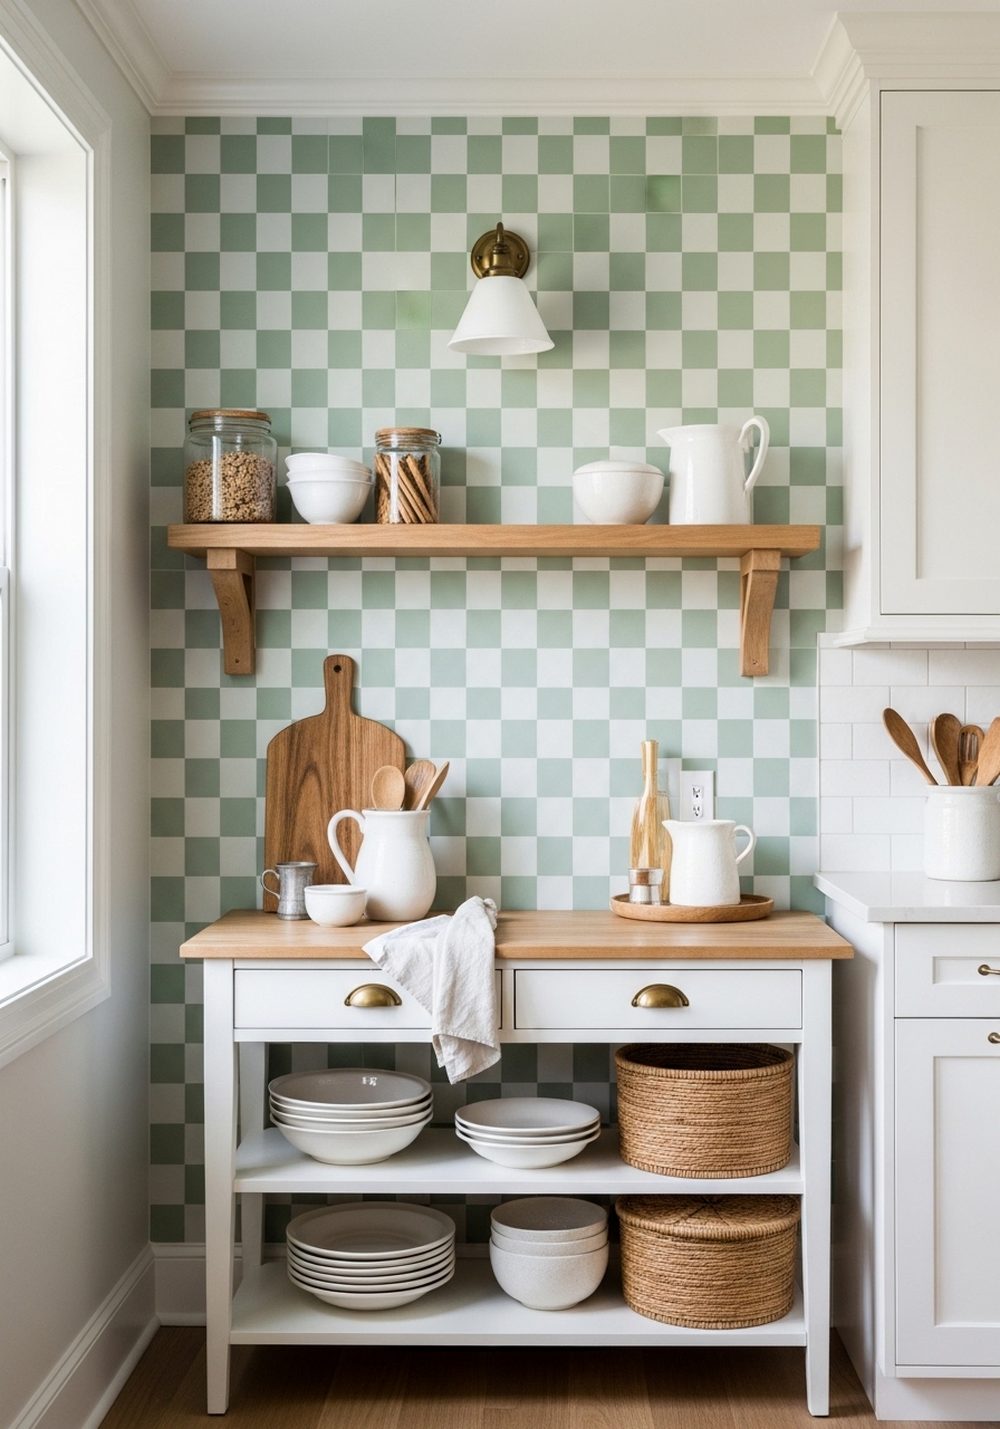
A sage green and white checkerboard accent wall offers a softer, more decorative way to use the pattern in a kitchen. It feels fresh, cottage-inspired, and slightly playful without looking too loud. This works well on a small breakfast wall, pantry area, or around built-in shelving where the pattern can be appreciated without taking over the room. Use paint or wallpaper depending on your budget and commitment level. Pair the wall with wood tones, antique brass, and creamy finishes so the green feels grounded, calm, and beautifully connected to the rest of space.
Best For: Cottage and cozy kitchens that need a gentle statement wall.
Where To Place It: On a pantry wall, breakfast corner, or small accent area.
Color Palette Tip: Pair sage with creamy white, honey wood, and muted brass.
Materials / Items Needed: paint or wallpaper, primer, painter’s tape, level, brush, roller, brass accents
Budget Level: Low — An accent wall creates impact without touching the whole kitchen.
DIY Difficulty: Medium — Clean spacing and careful measuring are important.
Style It Like This: Add wood frames. Use cream ceramics. Keep nearby decor understated.
Common Mistake To Avoid: Using too many shades of green can make the wall feel muddled.
Checkerboard Runner for a Narrow Kitchen
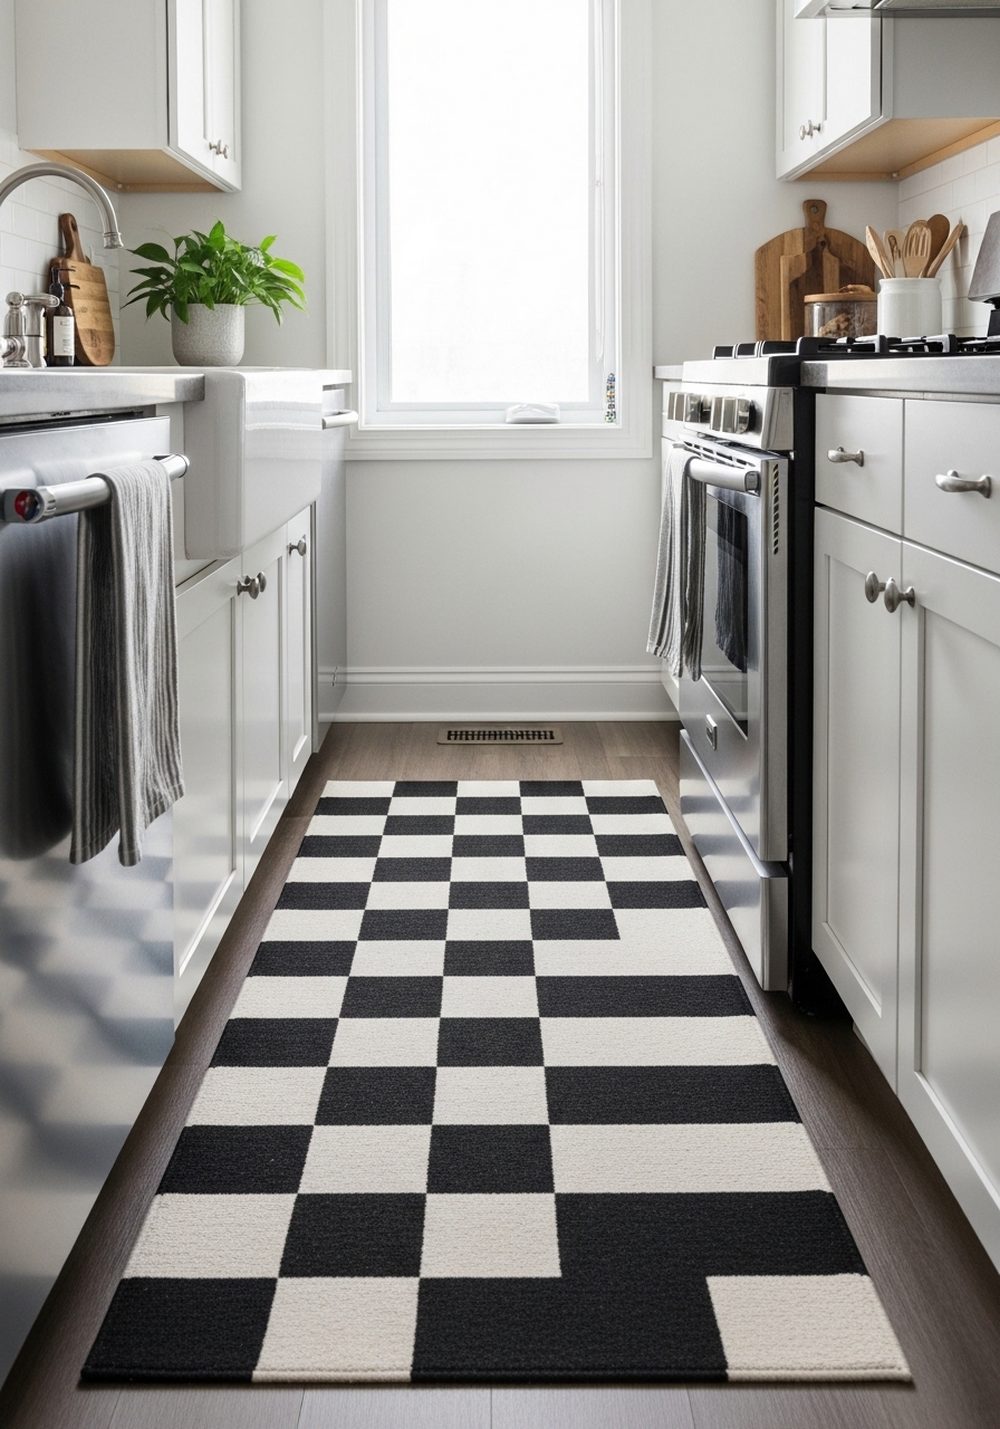
A checkerboard runner is one of the easiest ways to bring this pattern into a narrow kitchen or galley layout. It adds softness underfoot, protects the floor, and draws the eye through the space in a very natural way. This option is especially useful if you want the look without committing to tile or paint. Choose a washable runner for everyday practicality, and select colors that connect with your cabinets or hardware. Because the pattern is long and linear, it can also help a tight kitchen feel more styled, finished, and intentionally designed.
Best For: Galley kitchens and narrow spaces that need warmth and pattern.
Where To Place It: Centered along the main walkway between counters.
Color Palette Tip: Match runner tones to hardware, cabinetry, or wall color for cohesion.
Materials / Items Needed: checkerboard runner, rug pad, washable textile, coordinating accessories, floor-safe tape
Budget Level: Low — A runner offers quick impact at a small cost.
DIY Difficulty: Easy — Just place, align, and secure it properly.
Style It Like This: Keep surrounding floors simple. Repeat one rug color in decor. Add a plant.
Common Mistake To Avoid: Choosing a rug that is too wide can make the kitchen feel cramped.
Warm Terracotta Checkerboard Flooring
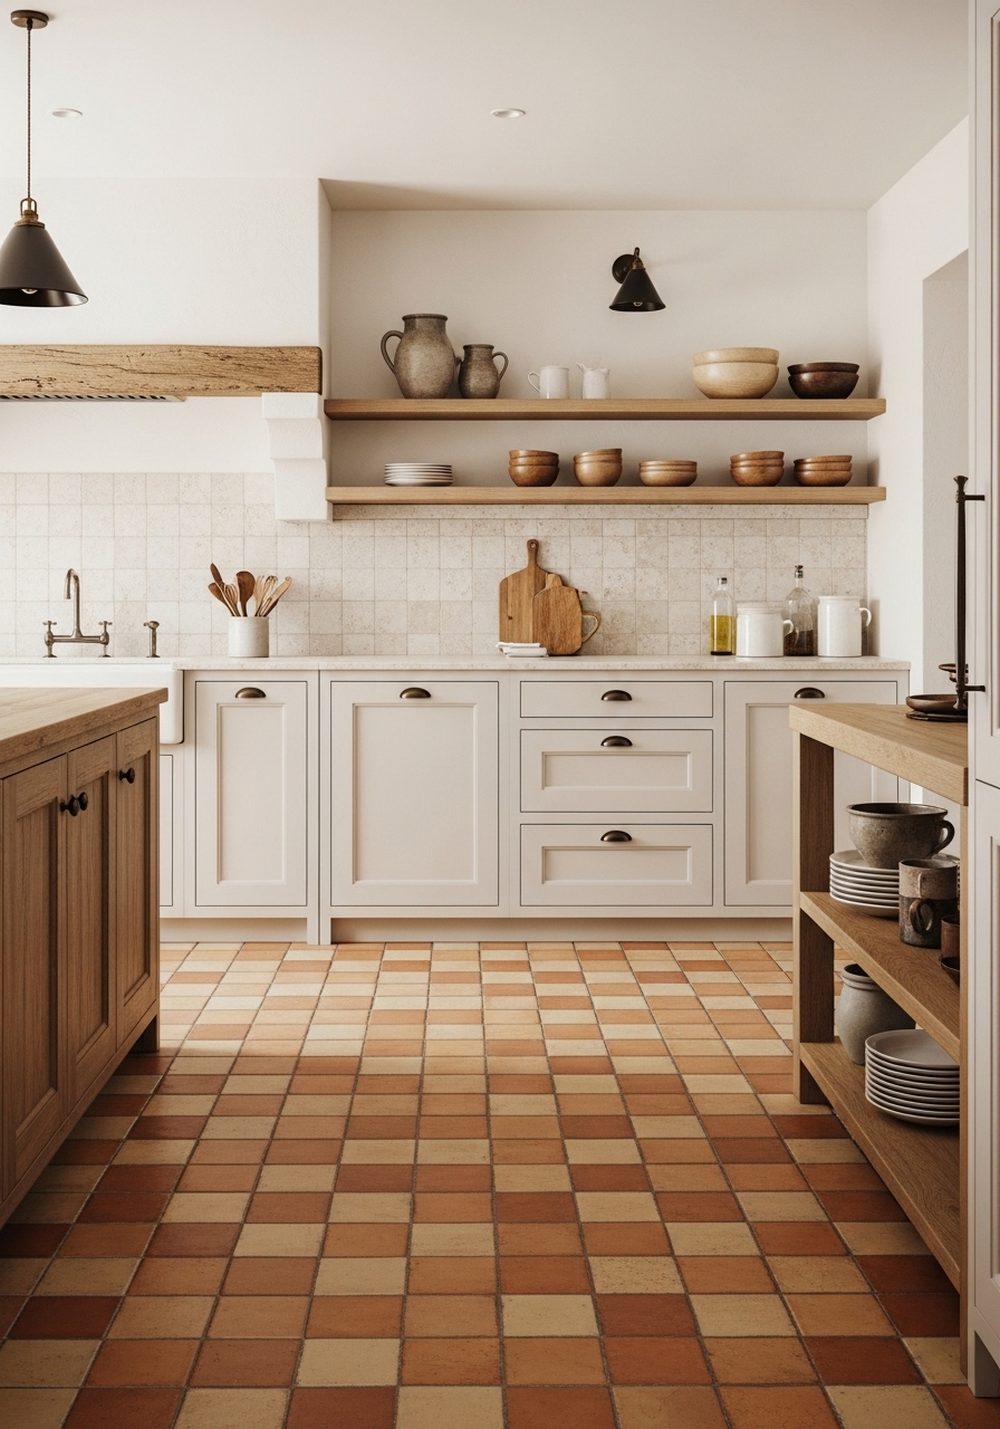
Warm terracotta checkerboard flooring gives the pattern a grounded, earthy twist that feels sunwashed and inviting. Instead of strong black contrast, this version brings in warmth and a handmade look that works beautifully with plaster walls, rustic woods, and open shelving. It suits Mediterranean, farmhouse, and relaxed traditional kitchens especially well. Pair the tiles with creamy cabinets and simple pottery to let the floor stand out naturally. Because terracotta has rich texture and color variation, the kitchen feels layered and lived-in rather than sharp or overly formal, which adds beautiful everyday comfort.
Best For: Rustic, Mediterranean, or farmhouse kitchens with natural character.
Where To Place It: Across the full kitchen floor or connected dining area.
Color Palette Tip: Blend terracotta with cream, clay, olive, and warm wood finishes.
Materials / Items Needed: terracotta tiles, cream tiles, grout, sealant, rustic wood accents, pottery decor
Budget Level: High — Natural material flooring and sealing can increase the total cost.
DIY Difficulty: Hard — Tile setting and sealing require patience and experience.
Style It Like This: Use pottery sparingly. Add wooden stools. Keep cabinetry creamy and simple.
Common Mistake To Avoid: Ignoring sealing needs can lead to staining and uneven wear.
Mini Checkerboard Decor Touches
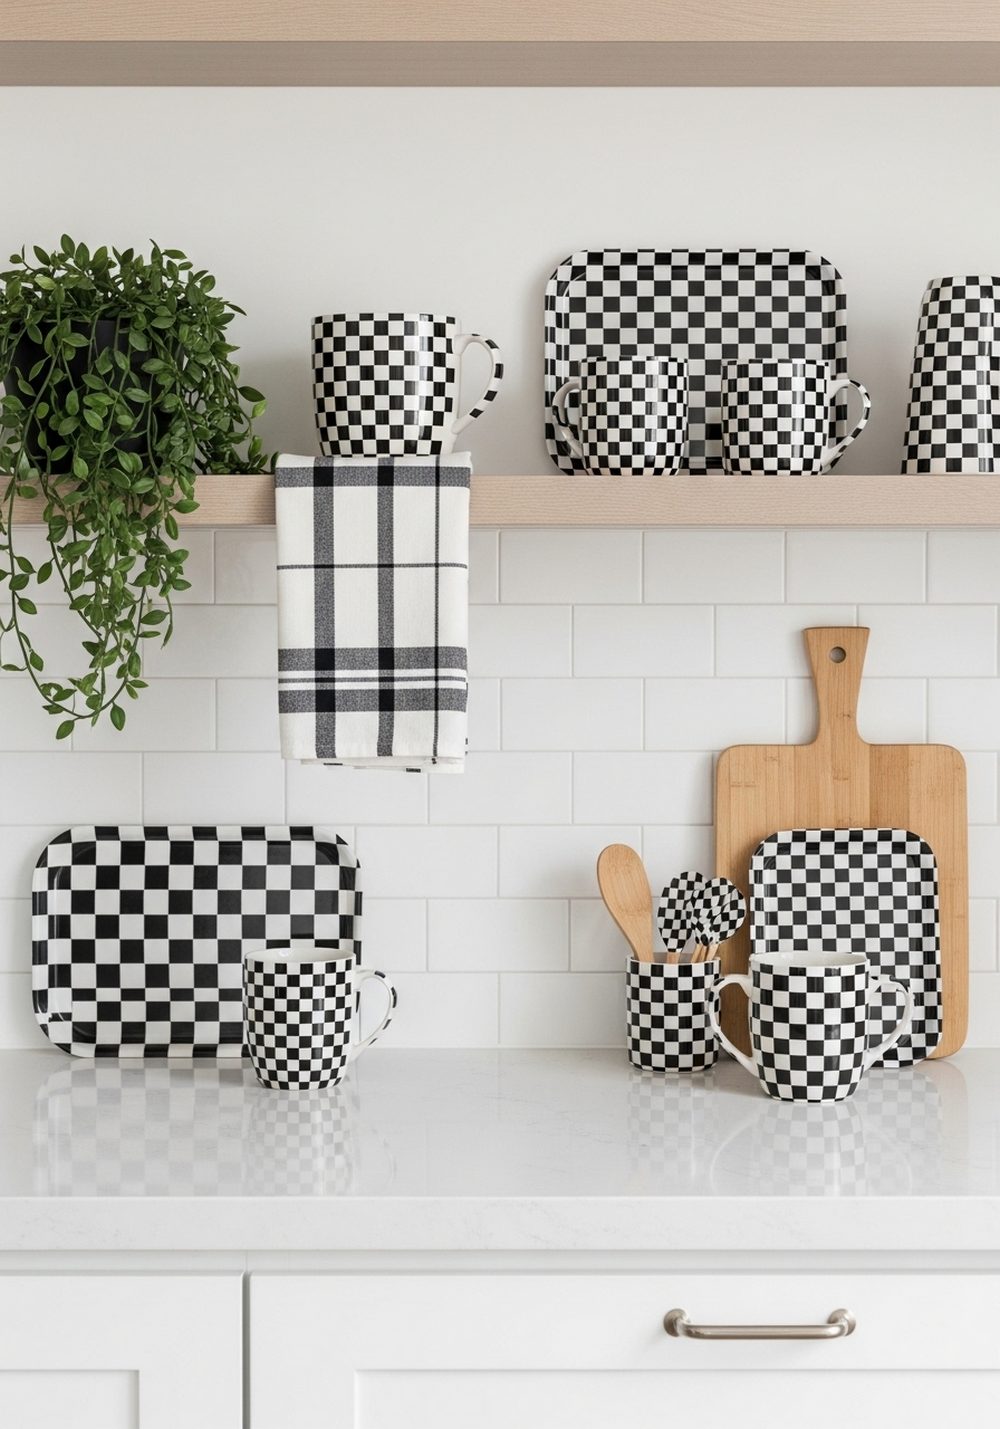
Mini checkerboard decor touches are perfect for anyone who loves the look but wants to keep the kitchen subtle and flexible. Small accents like tea towels, mugs, planters, trays, cutting boards, or lamp bases can repeat the pattern without taking over the room. This idea works well in modern kitchens that need a playful detail or in neutral spaces that feel a little flat. Keep the accents edited and intentional so they look styled rather than random. Repeating two or three checkerboard pieces is usually enough to make the theme feel connected and charming.
Best For: Subtle kitchen updates with low commitment and easy flexibility.
Where To Place It: On counters, open shelves, coffee stations, or windowsills.
Color Palette Tip: Keep mini accents within your existing kitchen palette for a polished look.
Materials / Items Needed: tea towels, trays, mugs, planters, cutting boards, lamp base, small decor accessories
Budget Level: Low — Small pieces make it easy to test the style affordably.
DIY Difficulty: Easy — No renovation needed, just thoughtful styling.
Style It Like This: Group items in threes. Repeat one color twice. Keep the rest minimal.
Common Mistake To Avoid: Using too many tiny pieces can make the look feel scattered.
Conclusion
Checkerboard kitchen decor can feel bold, soft, vintage, or modern depending on how you use it. The best approach is choosing one feature that fits your space naturally, then supporting it with simple colors, warm textures, and practical pieces. Whether you go for a full floor, a painted island, or a few smaller accents, this pattern adds energy and charm in a way that still feels livable, welcoming, and easy to enjoy every day.
FAQs
Q1: Is checkerboard kitchen decor only for vintage-style homes?
A: Not at all. Checkerboard details can look vintage, modern, rustic, or soft depending on the colors, materials, and surrounding finishes you choose.
Q2: What colors work best for a checkerboard kitchen?
A: Black and white is the classic choice, but beige, cream, sage, terracotta, and even muted blue can create a more relaxed and updated version.
Q3: How can I try checkerboard style without renovating?
A: Start with runners, shelf styling, dishware, tea towels, trays, or painted accents. Small touches are often enough to test the look.
Q4: Will checkerboard patterns make a small kitchen feel busy?
A: They can if overused. Keeping the rest of the kitchen simple helps the pattern feel balanced, even in compact spaces.
Q5: What is the easiest checkerboard feature to DIY?
A: A painted island, styled open shelves, or a checkerboard runner are usually the easiest and most budget-friendly options for beginners.